How to Meditate
Short video clips accompany many of the exercises described below.
To watch our complete 50-minute meditation video, please click here.
Note: These instructions are drawn from the vipassana traditions of Mahasi Sayadaw and Chao Khun Bhavanapirama Thera. It is assumed the reader is familiar with the article, What is Vipassana?
Contents
This article offers step-by-step instructions for nine insight meditation exercises, as well as a detailed explanation of mindful eating, hints on dealing with problems such as wandering mind, sleepiness, disturbing mental images, unpleasant emotions, and more.
The following exercises are not necessarily listed in order of difficulty. Exercises suitable for beginners are noted. We generally recommend beginners start with the rising and falling or hand motions exercise. Basic walking meditation is also appropriate for beginners.
To start, choose one or two exercises and practice them daily. Even after you gain more experience, you don't have to do all the exercises. Practicing just one exercise consistently is more important.
If there's something you don't understand at first, please don't let that daunt you. Although vipassana is a very simple method, many aspects of meditation only become clear by actually doing it. The best way to understand is to practice the exercises.
Although these Buddhist meditation exercises come from the traditions of the Burmese teacher Mahasi Sayadaw and the Thai teacher Chao Khun Bhavanapirama Thera, you don't have to be a Buddhist to practice them. Vipassana is a non-secular method.
[Note: This information is not meant to substitute for the guidance of a qualified instructor. Anyone serious about insight meditation should eventually find a teacher who can offer individualized counsel. In order to better understand some of the ideas presented here we recommend reading the link: What is Vipassana?]
Find a place where you can sit comfortably, without interruptions, for at least ten minutes. Although complete silence isn't necessary—or even desirable—for insight meditation, the room should be free of obtrusive noises such as music, television, constantly-ringing phones, and nearby conversations. Even quiet talk can distract you because the mind will try to understand the words.
On the other hand, background noises like the sound of traffic, the bark of a dog or a ticking clock should not be considered hindrances, and in fact can be legitimate objects of mindfulness. Don't wear earplugs in an attempt to "soundproof" your practice.
If you meditate in the bedroom it's better to sit on the floor instead of the bed, which may cause sleepiness. (If you are ill or disabled, however, it is fine to practice in bed). Your sitting meditation space doesn't have to be large. Even a walk-in closet will do.
Wear loose clothing if possible, and remove your shoes. Sometimes you might want to practice away from home (at the office, perhaps) and you won't be able to change clothes. But as long as you have privacy you can loosen your belt, remove your jacket and footwear, and find a comfortable place to sit.
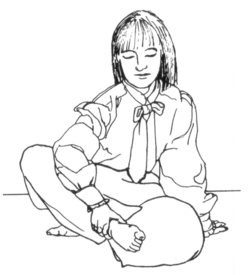
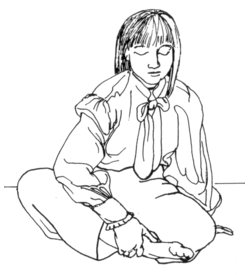
The following postures are suitable for sitting meditation: 1. Half lotus; 2. Full lotus; 3. Cross-legged tailor fashion; 4. Legs bent with one leg in front (Burmese style); 5. Kneeling on a meditation bench; 6. Sitting in a chair.
The first pose, half lotus, is the one most often seen in the Buddha statues of Southeast Asia. The legs are crossed and the right foot rests on the left thigh. This position is appropriate for most meditators. The next pose, full lotus, is only practical if you are very flexible. The right foot rests on the left thigh, the left foot on the right thigh.
Tailor fashion is less stable but easier than half lotus. Easiest of all the floor positions is the Burmese pose in which the legs are bent but not crossed. One leg lies in front of or "outside" the other. Both legs rest on the floor but don't touch each other. If these postures are too difficult you can sit on a chair or a meditation bench.
When using a chair, keep your feet flat on the ground and try not to let your back touch the chair. If you need to change posture because of discomfort, do so slowly and mindfully, observing the intention to move before shifting the body. Whatever pose you choose should be comfortable enough that you can maintain it without moving for at least twenty minutes (unless you're practicing for a shorter time, of course).
When sitting on the floor it will help to use a cushion. The cushion should be firm enough that it won't be compressed flat when sat on. The ideal thickness is somewhere between two and six inches. You'll want to experiment and find out what works best for you. Place the cushion under your buttocks with your legs touching the floor. The legs should not rest on the cushion. Elevating the hips takes stress off the neck and back vertebrae and aligns the spine, which allows you to sit comfortably for longer periods.
Regardless of which position you choose, don't let your back slump too much. On the other hand, you shouldn't sit so straight that you tense the body. Mind and body should feel relaxed, yet alert. Striking the right balance between the two extremes will take some experimenting. Think of tuning a guitar string: it should be just right—neither too tight nor too loose.
Having found a comfortable position, put your hands in your lap, one on top of the other, with the palms facing upward. Traditionally the back of the right hand rests on top of the left palm. Don't clench your hands. In all the exercises except walking meditation your eyes can be either open or closed (in walking meditation your eyes must be open).
We advise beginners to close their eyes, which allows for easier concentration. But sometimes concentration becomes stronger than mindfulness. In that case opening the eyes may help disperse the excess concentration and bring the two factors into balance again. Only momentary concentration is needed for insight meditation. Occasionally a meditator may experience disturbing mental images, in which case it may help to open the eyes.
Now you are ready to begin meditating. Choose one of the following exercises and practice it for at least ten minutes. Remember that all physical movements, such as walking and moving the hands, should be performed slowly, with continuous mindfulness. Shall we dive in?
Resolution
(Optional)
You may wish to make a resolution before each practice-session. Doing so will help strengthen your determination. You can use your own words, but the spirit of the aspiration should be something like this: "By this practice of insight meditation may I reach the end of suffering. May others also benefit from this wholesome action." Don't just repeat the words. Really concentrate on the resolve for a moment or two.
 |
View video of rising and falling or download the video. |
Exercise 1: Rising and Falling
(Suitable for beginners)
We recommend this vipassana technique for everyone. Adopt one of the sitting postures. If you are disabled or have a chronic illness you can do the exercise lying down.
If you choose a sitting position, place your hands in your lap, palms facing upward, the right hand on top of the left. If doing the exercise lying down, put your hands on the abdomen, one on top of the other, or at your sides. Close your eyes.
Next, direct your attention to the abdomen, an inch or two above the navel. Find the point that seems clearest to you. Don't actually look at the spot. Just place your mind there. The point should lie along the vertical midline of the body.
As you breathe in, the abdomen expands; as you breathe out, it contracts. In meditation these movements are called, respectively, "rising" and "falling." They never cease to alternate as long as you live.
As the abdomen rises, observe the motion from beginning to end with your mind. When the abdomen falls, do the same. That's all there is to it. Just keep watching the rising and falling movements. You don't have to do anything to them. Just know the movements without judging or describing them.
If it is difficult to perceive the rising and falling motions, put your hand on your stomach in order to feel them clearly.
Instead of making a continuous loop, the rising and falling motions are actually separate movements. Imagine a rock thrown straight up in the air. When reaching the highest point the rock stops for a fraction of a second before falling. Likewise, the abdomen stops rising for a moment before falling back.
As you do the exercise, restrict your attention to what is occurring in the immediate present moment. Don't think about the past or future—don't think about anything at all. Let go of worries, concerns, and memories. Empty your mind of everything except the abdominal movements occurring right now. But don't think about them; just know them.
It's important to understand that knowing bodily motion (or knowing anything) as it actually is in the present moment is entirely different from thinking about it. In insight meditation the aim is not to think, but only to know.
To know an object during vipassana meditation means to experience it with bare, nonverbal awareness. You merely register the sensation with impartial attention, without identifying, naming, judging or describing it. You don't have to comment on the movements: "That falling motion lasted longer than the previous one. That rising movement wasn't as clear as the others," and so on.
As soon as there is bare awareness of the rising or falling movement, you are already knowing it. The same is true of everything you might observe during meditation practice. No matter what appears, just know it with bare attention for one moment and then let it go.
Keeping your mind on the rising and falling movements may not be as easy as you'd think. Be patient and don't judge yourself, even if the mind wanders out often. Remember that you're learning a new skill. When learning to play the piano, for example, you wouldn't expect perfection right away. Likewise, you shouldn't expect it in meditation. Don't get discouraged if your progress seems slow. As long as you stick with the practice, results are sure to come.
As a beginner, you should label the abdominal movements with a mental note. A mental note—also called a "label"—is a word or short phrase said silently in the mind. The practice of mental noting helps keep the mind on the meditation object and prevents you from getting distracted. But this technique is only a temporary crutch. You should stop using the mental notes when mindfulness is strong enough to observe objects without them. If you're not sure whether mindfulness is strong enough, don't worry. In fact, the labels will fall away automatically when no longer useful, so you don't have to make a deliberate decision to stop using them.
Labeling an object with a mental note should not be confused with recognizing and inwardly saying the ordinary name of the object, which is what we do in daily life as soon as we see or hear something. Nor should we confuse mental noting with describing the object further. Mental notes support mindfulness in the early stages by increasing momentary concentration. But even when using the noting technique, we should focus on the actual experience of the object instead of on the label, letting go of the conventional names, associations and meanings that in ordinary life are automatically attached to sense-impressions.
Here's how to use the mental noting technique with this exercise: As the abdomen expands, say the word "rising" in your mind. When the abdomen contracts, say "falling." Continue to note rising, falling, rising, falling, rising, falling, from one moment to the next.
Only say the mental note one time per movement. For example, during one rising motion you would say the word "rising" once, stretching the word out to last as long as the inhalation. When beginning to exhale you would say "falling," stretching the word out to last as long as the exhalation. Again, these words are said silently. And as we mentioned a moment ago, even when using the mental notes, try to keep your attention on the actual movement instead of on the word. The aim is to know the experience itself.
The mental note should coincide with the motion, not be tagged on afterwards. Sometimes you might catch yourself saying "falling" after the rising movement has begun, or vice-versa. In that case you are no longer knowing the present moment. Just start over again from that point, noticing what is actually happening now. Later we'll talk more about mental notes.
During the rising-falling exercise don't focus on the breath or the physical components of the abdomen. Keep your attention on the surface of the body and focus only on the movement, which is perceived subjectively as a subtle sensation of tactile pressure, a sensation which keeps changing from moment to moment.
Imagine lying on your back, putting a coin or some other object on your stomach and, with your eyes closed, mentally "watching" the coin move up and down as you breathe. Or think of a buoy on the water, moving up and down with the waves. The coin and the buoy are like the spot on the abdomen, and the meditator just follows the up and down movement.
A couple of pointers: the abdomen should not be visualized. You only have to be aware of the movements. And be sure to breathe naturally. Don't try to control your breath (but if you can't perceive the abdominal motions you may take a few very deep breaths with your hand on your stomach in order to help you sense the movements. Afterwards, let your breathing return to normal).
If you can watch your abdomen rising and falling one time, you can practice insight meditation. Why not try it right now before you continue reading? It will only take a few seconds.
Close your eyes and inhale, observing one rising motion; then exhale, observing one falling motion. Don't worry—this page will still be here waiting for you. It isn't going anywhere. You can continue reading after trying the exercise. Let any resistance drop away. Go ahead and try it now, on the count of three. One, two, three: Begin.
Congratulations. You see? Insight meditation isn't difficult.
Here is some additional information about observing the abdominal movements. A single rising movement of the abdomen lasts about two or three seconds. It has a beginning, middle and end (and so does the falling movement). Ideally your attention should be equally alert for the entire duration of the movement. Notice the motion as the abdomen first begins to expand, keeping your attention continuous throughout the development of the movement, until the abdomen reaches the highest point and stops expanding. Don't just focus on the middle stage, which is the most obvious part. The beginning- and end-points should be noticed, too. When the abdomen stops expanding, let go of the rising movement and re-focus your attention on the beginning of the falling movement. Observe the falling movement in the same way, from beginning to end.
Please note, we're not saying you should mentally chop one abdominal movement into sections. One rising or falling motion should be noticed smoothly, without breaks, until it is over, at which point you would let it go. The same applies to the motion of the feet in walking meditation, the movements of the hands in Exercise 3, and so on.
The rising-falling exercise is not only for beginners. Most experienced meditators continue to use it as their main practice. Even if you move on to the other exercises you should not forget about this one, since the abdominal movements can be noted anywhere, any time.
Motion belongs to the first foundation of mindfulness, the body. The rising-falling motions are material form (in Pali, "rupa"). Regard them with a detached, scientific attitude. In the ultimate sense, these movements do not belong to you. They are only impersonal phenomena, not your self. In truth, they are not a part of you. They are not the mind, either. It is the mind (nama) that knows them. Yet in ultimate terms the mind—what you call "your mind"—is not a self, but just an impersonal faculty whose function is to be aware of something.
Practice the rising-falling exercise anywhere from ten minutes to one hour. If you want to meditate longer than an hour, it is best to alternate this exercise with walking meditation.
In many of the exercises presented here, the meditator watches bodily movement. When observing the abdominal motions or any other form of bodily movement, the student should focus on the movement itself instead of on the physical body part.
The two ways of focusing might be compared to looking at a windmill in two different ways. We might look at a windmill in order to discover the direction of the wind, or we might study the windmill's structure because we're going to repair it. In the first case we only pay attention to the motion of the windmill-blades—their speed and direction. We don't notice details about their shape, structure and color. Who cares? The physical details of the blades tell us nothing whatsoever about the wind, so there's no reason to focus on them. All we care about is the path they make through space as they move.
Likewise, although we are aware of the foot during walking meditation, we don’t care about its corporeal mass, which only serves as a "marker" for the important part, the movement. Instead of trying to feel each muscle or experience a deeper sensation within the foot, our focus is only on the path it makes through space—the trajectory the foot describes in the air with each step. All other bodily movements, including the abdominal motions and the movements of the hands in Exercise 3, are observed in precisely the same way.
Just watch the path of the movement, and do so as it is happening. Keep abreast of the movement in the present moment so your awareness doesn't lag behind.
Sometimes you'll feel bored or uncomfortable during meditation. You might keep peeking at the clock, wondering how much time has passed. Another twenty minutes to go! How will you get through it? Even one more minute seems too much.
When that happens, limit your goal. Just take it one breath at a time. Remind yourself, "I only have to note one rising movement." Or, "I just have to note this single falling movement. Just this much." To let go of your resistance, worry or aversion for one moment isn't hard (and even during those times when it isn't easy, it's still possible). Then do it again for one more moment. And again. In a few minutes the feeling of resistance may change by itself, because it's the nature of the mind to change.
So don't worry about the future during meditation practice. Let go. To think ahead, even if only to the next breath, is to move away from the present moment. Then thoughts will get stirred up—distracting, delusive thoughts about how difficult or boring meditation is. You'll think of many things you'd rather be doing. Soon those thoughts will force you to stand up and walk away from the cushion without having finished your meditation session. It's important not to follow those thoughts, because they are nothing but the mind's attempt to trick you into giving up. Instead of allowing such thoughts to control you, just stay in the now. Take it one moment at a time.
If meditation seems very difficult or you lack self-discipline, try this strategy: decide you will meditate just one minute per day. Anyone can do that, right? You will find, however, that once you get "over the hump" of your initial resistance and actually sit down to do it, you might sometimes want to meditate longer. It's that initial hurdle that's the most difficult. But even if you don't end up meditating longer, keep practicing one minute every day, without exception, and your attitude will gradually change.
While observing the abdominal movements, other phenomena will sometimes intrude—thoughts, sensations of itching, pain, numbness, emotions, sounds, and so forth. In the following sections we'll discuss how to deal with some of these objects.
Every meditation technique uses a meditation object: something to focus your mind on. In Exercise 1, the rising and falling abdominal motions are the primary or main object. Although you should try to keep your attention on the primary object, other phenomena may be noticed at times. (We'll talk about when to notice them in a moment.) These other things are called "secondary objects."
Here we should explain that the word "object" has a special meaning in vipassana practice. It does not refer to a three-dimensional Thing like a desk or a bicycle. An object means something that is known by the mind (something you're aware of) in the present moment, as opposed to the subject that is knowing it. The subject is the mind or "knower." (Yet, in the ultimate sense, the subject is not a self but the mere faculty of knowing).
In vipassana, an object of awareness can be either material or mental. Practically speaking, a "material object" refers to a sense-impression: color, sound, odor, tactile sensation (including bodily movement), and flavor. A mental object refers to such things as pleasant or unpleasant feeling, desire, anxiety, peacefulness, anger, thought, and so on.
As we said, while you're observing the rising-falling movements other phenomena will be appearing and disappearing. You might be aware of sounds. Sometimes you'll experience emotions and thoughts. You might feel itches, numbness or discomfort in the body, or you might feel very peaceful. All of these are secondary objects. In short, a secondary object is anything you're aware of that is not the primary meditation object.
When should you deliberately focus on a secondary object? If a secondary object makes only a faint impression on the periphery of your awareness and does not strongly hook your attention, ignore it and continue observing the primary meditation object. In that case, of course, you don't need to label the secondary object with a mental note.
But if a secondary object hooks your attention and pulls it away, or if it causes desire or aversion to appear, you should focus on the secondary object for a moment or two, labeling it with a mental note. After that, drop it and resume watching the primary meditation object. Only observe one thing at a time.
A mental note identifies an object in general but not in detail. When you're aware of a sound, for example, label it "hearing" instead of "motorcycle," "voices" or "barking dog." If an unpleasant sensation arises, note "pain" or "feeling" instead of "knee pain" or "my back pain." Then return your attention to the primary meditation object. When aware of a fragrance, say the mental note "smelling" for a moment or two. You don't have to identify the scent.
Your eyes will usually be closed during the rising-falling exercise, so you won't have much occasion to see. But sometimes you might want to open your eyes, such as when changing posture. When you are aware of color, note the bare sensation of seeing for a moment or two, labeling it "seeing." Don't pay attention to what the sight is an image of, or whether it's attractive or unattractive. Then go back to observing the primary meditation object.
Using mental notes helps prevent clinging and aversion from arising. But as soon as an object is noted it should be let go of. Even the sensation or thought you noted one moment before should not be kept in the mind. In meditation practice every phenomenon should be dropped as soon as it is noticed.
A mental note should usually be limited to one or two words. If it's too long another object will have arisen before you finish saying the note. A mental note should also be a word easily recalled so you don't have to search your mind for it. Don't waste time looking for the right mental note. That will take you out of the present moment. If you don't know what to call something use the general label "knowing."
If an object has already disappeared before you were able to label it, don't go back and tag on the label. Let go of all the previous objects and start over again from this moment, by noting whatever is being experienced now. But if most of the objects that arise seem "faster" than the mental notes, you don't need to use the notes any more.
However, although the labeling technique is mainly for beginners, even advanced meditators benefit from using it when mindfulness and concentration are weak. Don't be afraid to compare both procedures. Use the mental notes, and then drop them for awhile. What is the difference? Are you able to focus on the present-moment object equally well in both cases? Eventually you'll know instinctively when the labels are useful and when they merely get in the way.
Remember: the mental notes are said silently at the exact moment of perceiving the object, not added later.
The instructions for noting secondary objects apply to all the meditation exercises in this article.
In the beginning your mind will often wander during meditation, spinning out thoughts about the past and future. Be assured this is normal; but what should you do when it happens? The strategy is simple: When you catch yourself thinking, silently say the mental note "thinking" for a moment or two, and then gently return your attention to the rising-falling movements (or whatever primary meditation object you were observing).
But after gaining some experience in vipassana practice you may notice thoughts that are very faint or in the "background" of awareness and don't hook your attention. Before you can label them with a mental note, they're already gone. In that case there's no need to label the thoughts. Just keep observing the primary meditation object and ignore the thoughts, which will fall away on their own.
The latter approach is mainly for intermediate and advanced meditators. Since it is more difficult for beginners to notice when they are thinking, there's a greater chance the mind will be hooked by a thought and get carried away on a long tangent before you realize it. Immediately labeling thinking with a mental note helps prevent this.
Don't get upset or judge yourself when the mind wanders away. Keep gently bringing it back to the main meditation object. Be patient with yourself and understand that it's the nature of the mind to think, so training it to stay in the present moment and just know takes time.
Actually, if you are aware the mind has wandered it means you are being mindful. If you didn't have mindfulness, you wouldn't know the mind had drifted away. In daily life we're unaware how distracted and agitated our minds truly are. Only when making an effort to meditate can we see the full extent of the mind's restlessness as it jumps from one thought to the next. The suttas compare it to a monkey in a tree jumping from branch to branch.
When you catch the mind wandering you might be tempted to wonder, "How long have I been thinking? When did I lose track of the rising-falling motions?" But those are more thoughts, and even as you're thinking them more rising-falling movements are passing by unnoticed. Don't go back to find the spot where you lost mindfulness or try to reconstruct the links in the cognitive chain. You can't bring those past moments back in order to acknowledge them. Let them go and start over again from this moment.
One reason the mind easily wanders off on tangents is that we tend to believe wholeheartedly in the content of our thoughts, and so whenever a thought arises we get mesmerized by its "story." We may not think of ourselves as people who are easily fooled, but this is one area in which most of us are completely gullible, especially when the thought carries an emotional charge. When pleasant thoughts appear we get caught up in the fantasies, fueled by desire. When unpleasant memories arise we focus on how we were wronged, getting more and more upset. Whether the content of the thought is pleasant or unpleasant, we tend to assume it has substance instead of recognizing that it's just an empty vibration arising and passing away.
During vipassana practice meditators should try to ignore the content of their thoughts completely. It doesn't matter whether a thought is good or bad, pleasant or unpleasant; the conventional meaning is irrelevant in meditation. The attitude is to look upon all thoughts as general instances of "thinking," without paying attention to the details that differentiate one thought from another. All thoughts (indeed, all objects) have equal value in vipassana practice.
We don't have to feel guilty about having unwholesome thoughts. The key is to be aware of them as soon as they arise. If we're aware of them in the present moment, mindfulness is already there. Everyone has bad thoughts at times. In reality most thoughts arise spontaneously due to causes we cannot directly control. Instead of trying to suppress them during meditation, the right approach is to "know and let go."
Imagine two meditators: the first has many angry thoughts but doesn't get involved in them (or act on them, of course). He notes and lets go of them right away. The second meditator clings to beautiful thoughts about the Buddhist teachings. Which student is practicing vipassana correctly? The first.
When a meditator is aware of a thought early enough, he realizes, "The thought was not in existence before; it appeared just now and disappeared at once. I had previously imagined thought to be permanent because I had not carefully observed it. Now that I have watched it, and seen it disappearing, I know it truly as it is, impermanent" (Mahasi Sayadaw, The Great Discourse on Not-Self, pp. 115—6).
It is important to understand how to observe thinking correctly because, as Mahasi Sayadaw explains, thoughts and tactile sensations—especially sensations of bodily movement—are the most frequent objects of contemplation. Even exalted thoughts about the Buddhist teachings should be let go of, as should painful thoughts.
When no thoughts or other secondary objects distract you, your attention should stay with the primary meditation object.
The vipassana technique involves focusing on one thing at a time. That doesn't mean you have to observe one object exclusively for the entire meditation period. It means focusing on one thing per moment. Observing two objects or sense-impressions in the same moment "confuses" mindfulness. Therefore, when observing a rising or a falling motion, ignore other objects. Don't pay attention to sounds, thoughts, feelings or smells.
But it should be understood that in any two consecutive moments the meditation object may be different. In vipassana your attention may jump from one meditation object to another. You might observe a falling movement of the abdomen, and then in the next moment observe a sound. So even if you sit down to practice the rising-falling exercise for thirty minutes, it doesn't mean you will observe the abdominal movements during every single moment of that half-hour period. Secondary objects will sometimes hook you, and whenever you deliberately note a secondary object you should switch all of your attention to it (even if just for that one moment). Whatever object you're observing at any given moment should be the only thing you focus on in that moment.
For instance, if a sound pulls your attention away from the abdominal movements, switch your attention to the sound and note "hearing" for a moment or two. For those few seconds ignore everything else, including the rising-falling motions. (While doing this you might still be aware of other phenomena in the background or on the periphery of consciousness. That's all right. The point is you are not intentionally focusing on them). After one or two moments of noting "hearing," return your attention to the primary meditation object and forget about the sound. The same procedure applies to anything else you might observe—thoughts, emotions, itches, smells, feelings, and so on.
By focusing on one object at a time, a meditator is able to perceive the three phases of each moment—arising, persisting, and vanishing—more and more clearly. On the other hand, if a beginner tries to be aware in a general way of whatever comes up, noticing is vague. Because his attention is scattered across several objects at once, none is particularly clear. Since he is trying to observe the whole stream of experience simultaneously, he may not know which object he’s noticing at any given moment, and it is difficult to gain insight.
When two or more objects—such as a movement and a sound—occur simultaneously, the general rule is to observe the one that makes the strongest impact on the mind, or the one that triggers more desire or aversion.
As we explain throughout this article, the vipassana motto is: know and let go. Or we can say, "Focus and forget it." They mean the same thing. All insight meditators should memorize one of these phrases.
The letting go or "forgetting" is just as important as the knowing or focusing. During meditation practice a student focuses on one thing at a time and then lets it go. He keeps "knowing and letting go" repeatedly, from one moment to the next. In Exercise 1, for example, we focus on the rising movement of the abdomen, and then drop it. In the next moment we observe the falling movement, and then let it go. The moment after that we're aware of the rising movement again; as soon as it ends we forget it. And so on.
That's how to describe the procedure in words. But in practice, as we explain elsewhere, "letting go" is not a separate action. Letting go of the previous meditation object happens automatically every time we focus in the present again.
Let's take another look at Exercise 1. We observe one rising movement of the abdomen until it ends. Immediately after that, in the next moment, we bring our attention to observe the falling movement. But in the act of bringing our attention into the present again to see the falling movement, the rising motion is simultaneously forgotten. In truth, consciousness can only be aware of one thing at a time. It has to let go of the previous object in order to know something else.
That's why we don't have to let go as a separate step. Letting go and re-establishing our attention in the present moment are the same. Letting go of the past happens by itself whenever we truly bring the mind back to the here and now. But re-establishing our attention in the present is something we have to keep doing, gently, with every single moment. The present is not static. There is always a new "present moment."
Therefore, what we are actually doing during vipassana practice is: knowing, knowing, knowing, in a chain of moments. Or we could describe it like this: knowing-the-present, knowing-the-present, knowing-the-present. In an article for tricycle.com, Joseph Goldstein describes how to do this with the abdominal movements: "Train your awareness to connect clearly with the first moment of the beginning in-breath. Then sustain the attention for the duration of just that one in-coming breath. Connect again at the beginning of the outbreath and sustain your attention till the end." (http://www.tricycle.com/brief-teachings/meditation-instructions). As meditators, our only job is keep bringing the mind back to knowing what is happening right here in this present moment. And now this one. And this one.
During vipassana practice you might feel an itch somewhere on the body. In daily life sensations of itchiness arise frequently, but since the normal response is to scratch the itch unconsciously, without clear mindfulness, people don't realize it happens hundreds of times per day. As a result of meditating, you begin to see that uncomfortable bodily sensations arise much more often than you had thought.
If you can keep your attention on the principal object and let the itch stay in the "background," it will often disappear by itself. If it doesn't disappear but becomes more uncomfortable, just watch the sensation for a few moments, saying the mental note "feeling" or "itching." Desire might arise—desire to be rid of the feeling. Label it "wanting" or "desire." (Here you don't observe the sensation of itchiness per se, but the wanting itself, which is a different object).
If the itch persists and you have to scratch it, use the following step-by-step technique:
- Observe the desire to be rid of the feeling, saying the mental note "desire."
- Before moving your hand, note "intending to move."
- Mindfully move your hand to the itchy spot, noting "moving."
- When you reach the spot, stop moving your hand for a moment and note, "intending to scratch."
- Scratch the itch, noting "moving" or "scratching." Stop.
- Move your hand back, saying the mental note "moving." Stop.
- Put your hand in your lap, noting "placing." Now you are back in the original meditation posture.
- Note the pleasant feeling that has replaced the unpleasant one, labeling it "feeling" for one or two moments. Notice if liking arises for the good sensation. If it does, label it "liking" or "desire."
- Resume watching the primary meditation object.
Whenever you keep the body in the same position without moving it, sooner or later pain will arise. How should you deal with pain during meditation practice?
Instead of automatically shifting the body when you feel discomfort, try to observe the sensation itself, labeling it with the mental note "pain" or "feeling." Sometimes the pain will disappear on its own. Sometimes it will grow stronger first, and then diminish or disappear. In any case, by observing unpleasant feeling you will notice that it does not stay the same. It changes from moment to moment. Like everything else, pain is impermanent.
But if the pain becomes too severe you should change position. Beginners shouldn't try to grit their teeth and tough it out. Only advanced meditators can observe severe pain effectively. The object is too heavy for a beginner's mindfulness to "lift."
On the other hand, you don't want to change position at every little twitch or tingle. Don't give in to desire easily. Meditators won't make progress without the patience to bear many unpleasant feelings. Only change position if you cannot tolerate the discomfort and it is interfering with your mindfulness.
If you decide to change position, follow this step-by-step technique:
- Observe the sensation of pain for a few moments, labeling it "pain" or "feeling".
- Note the desire to be rid of the pain. If possible, wait until your mind is no longer struggling against the painful feeling before going to the next step.
- Say the mental note "intending to move."
- Slowly move the body into the new posture, noting "moving." Break the entire action into several smaller movements, stopping fully after each one. This creates clear objects for mindfulness.
- Note the pleasant feeling that has replaced the pain, labeling it "pleasure" or "feeling" for a moment or two. If you like the feeling, label it "liking," or "desire."
- Resume watching the primary meditation object.
By practicing insight meditation we gradually realize there is no bodily position comfortable enough that we can always maintain it. Pain inevitably appears, even when lying down (if you doubt this, ask anyone who is bedridden in the hospital). No matter how comfortable the position is initially, we are always forced to move because of the changing nature of the physical elements. That is one way in which the body is unsatisfactory, or a cause of suffering.
For more advanced meditators there is an additional method for dealing with physical pain, which is to disengage your attention from it and observe the mind itself.
Sometimes when you have bodily pain, even in daily life, the mind is momentarily distracted from it. When you're aware of the pain again you realize that for those few moments of thinking about your finances, or an argument you had with a loved one, or the things you need to buy at the store, you didn't actually feel the discomfort anymore. Why? Because the mind was occupied with something else. It is a fact that consciousness can only know one thing at a time. When you are thinking about something else you cannot be aware of pain at the same time.
From this experience you realize that when the mind lets go of pain and focuses on a different object, the pain effectively disappears. But that's not to say you should think and fantasize during meditation practice. You should stay in the present moment, but separate or disengage your mind from the feeling and put your attention on the mind itself—the knower or the one knowing the experience. You may then see that the mind or knower arises and passes away from moment to moment.
With this method you let the pain be there in the background if it's going to, but you don't pay attention to it. The attitude is that you don't have to get involved with the pain or worry about it. The unpleasant feeling is solely the business of the body. If you can separate your mind from the pain and let go of it, you won't experience the suffering in the same way as before. Then, even though the physical sensation may still be there, it won't be experienced as "hurt", and it won't make the mind suffer. But this is an advanced technique which is not recommended for beginners.
Generally speaking, when feelings arise during meditation they should be observed and labeled with a mental note. That is not only true of unpleasant feelings such as pain. If you fail to observe a pleasant feeling when it arises, attachment can develop. Before you're even aware of it, you will cling to the feeling. It is easy to get caught up in pleasure and forget about staying in the present moment. Whether a feeling is painful or pleasant, after noting it for a moment or two, let it go.
You should also be aware of any desire that arises in connection with feeling—whether the desire to get rid of a painful sensation or to prolong a pleasant one. When desire arises, label it with a mental note.
Some meditators see vivid mental images when reaching a certain stage of insight. Others never see such visions. Whether or not they appear depends in part on the student's temperament. The images might be of anything at all: people, animals, gardens, colors, decaying bodies, abstract shapes, or even the Buddha.
These visions can range from exquisitely beautiful to very frightening. But no matter how vivid they seem, these images are not real. They are mental formations that arise from imagination (coupled with concentration) and have no significance. They are neither good nor bad. The meditator should neither desire nor fear them.
If an image occurs, try to focus on the primary meditation object again (such as the rising-falling motions), ignoring the image. Let the image remain in the "background," but don't pay attention to it. Eventually the image will fade away.
If the image persists and interferes with your practice, there are several things you can do:
- Practice with your eyes open.
- Label the image with a mental note. (You can use the word "image" or "seeing," although it should be understood that knowing a mental image is not the same as genuine seeing.) Continue to note the image from moment-to-moment until it disappears. The image will often disappear after several notings.
- Switch to a different meditation exercise. If you are sitting, get up and practice walking meditation or do the hand motions exercise.
If you note the image with the aim of getting rid of it due to aversion or fear, it will last longer. Enjoying the vision will also make it persist. Whether it is pleasant or unpleasant, try to note the image impartially, just as you would any other object, without liking or disliking it.
Mindfulness When Changing Posture
Insight meditators usually alternate a period of sitting with an equal period of walking meditation, especially during an intensive retreat in which vipassana is practiced many hours per day.
During the transition between postures it is crucial to maintain step-by-step mindfulness. When the sitting time is over, resist the temptation to jump up suddenly or automatically stretch your back or legs without being mindful of your movements. In the long run, even a few moments of speeding up will slow you down. Careless movements cause a break in continuity that scatters mindfulness.
In the old days before lighters and matches, fire could only be produced by rubbing two sticks together until the friction created a spark. Continuity of effort was essential in getting a flame. If you stopped to rest, the sticks would go cold and you'd have to start over. Continuity is just as important in vipassana practice.
Here we'll describe how to change from sitting to standing in a step-by-step manner, enabling you to maintain mindfulness. The same principles apply to all the other postures.
First, note your intention as "intending to move." Next, start moving the body slowly, breaking the motion down into a series of separate actions. Stop completely after each movement. Bring each hand to your stomach one at a time. Tilt your torso forward as you prepare to stand. Uncross your legs. Lift one leg and then the other. Note the feeling of pressure against each foot as you place it on the floor, and then slowly stand up.
Each of these actions should be performed slowly, methodically, and observed from beginning to end. Whenever possible, move only one body part at a time. It's very important to stop fully at the end of each movement. Label each action with an appropriate mental note or simply note "moving."
Once the body is upright you should observe the standing posture for a few moments, noting "standing." This means to focus awareness on the position or shape of the body, being aware of how it feels. If this is difficult you can focus on one point, such as the spot where the soles of your feet touch the floor. (For a more detailed description of how to observe bodily posture, please see Exercise 4).
Whether you are standing, sitting, or lying down, apply this step-by-step technique whenever you change posture during vipassana practice.
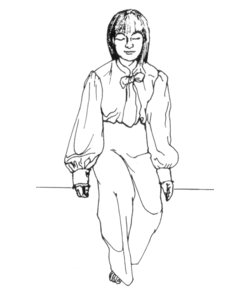
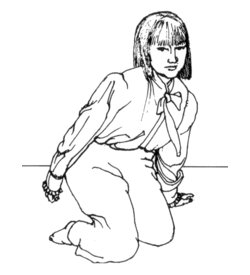
Below are a series of drawings that illustrate the reverse process, changing from standing to sitting, in even more detail. Here the process has been broken down into sixteen steps (this information has been adapted from Helen Jandamit's book, The Way to Vipassana, Bangkok, V.H. Publications, 1990).
- Begin by standing with your feet together, arms at your sides (alternatively, you may hold your arms in front of the body, one hand clasping the wrist of the other). Move your left foot backwards, noting "moving."
- Slowly bend your knees, noting "moving" or "down".
- As your left knee touches the ground, note "touching".

- Move your left hand toward the floor, noting "moving."
- Place your left hand on the floor, noting "touching" (your hand needs to be in this position to support the body prior to moving the right leg).
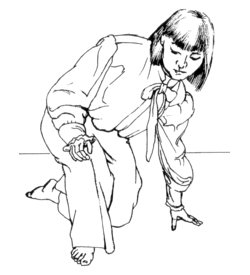
- Move the right leg back until it is parallel with the left leg, noting "moving."
- When the right leg touches the floor, note "touching".
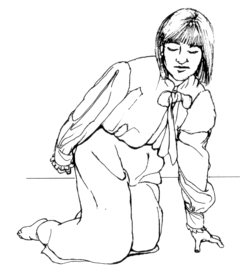
- Move your left hand backwards, noting "moving."
- As your left hand touches the floor, note "touching".
- Lower your body until you are sitting, noting "lowering".
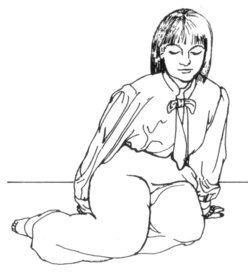
- Move the left foot backwards so that it is further under your body (it should be in the correct position to sit cross-legged), noting "moving."
- Lifting the right knee, move the right foot forwards, noting "moving".
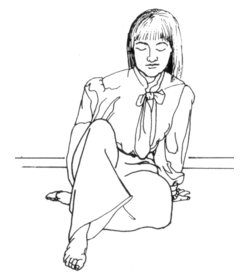
- Reach your right arm forward and take hold of your right ankle, noting "grasping".
- Lift the right foot, noting "lifting."
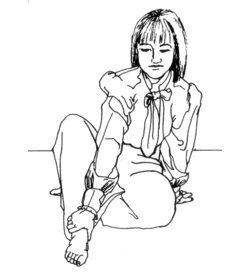
- Move the foot towards the body, noting, "moving".
- Set your foot on the floor, noting "placing".
- Put your hands in your lap one by one, noting "moving."
This series of movements is only one of many possibilities, and does not have to be followed precisely. If you have a disability or other chronic physical problem you may need to alter the steps. Adjustments will also have to be made if you meditate in a chair. The important thing is to follow the principle of breaking down larger movements into separate, smaller actions that can be noted one at a time, and to stop completely at the end of each action before beginning the next. Also, be sure to acknowledge each movement with a mental note, especially if you're a beginner. You may devise your own notes; the ones given here are only suggestions.
Exercise 2: Walking Meditation
Walking meditation is an important vipassana technique. The basic walking meditation exercise is similar to normal walking, only slower and more deliberate. Your attention should be minutely focused on each action.
The primary object during walking meditation is the motion of the feet. Observing the movement of the feet is essentially no different from watching the abdominal movements or the motions of the hand in Exercise 3. Don't try to feel the muscles in the foot, or a sensation in the foot. Instead, observe the movement itself. In other words, with each step observe the path the foot makes as it moves through space.
Pay no attention to the abdominal movements during this exercise. As we said before, only observe one object per moment.
One final note: don't look at your feet. Just be aware of the movements with your mind.
The best environment is one with few visual distractions. Remove your shoes, if possible. You should have enough space to walk at least seven paces in a straight line.
Follow the instructions on changing from sitting to standing.
Once you are standing, hold your hands in front of your body, one hand gently clasping the wrist of the other. Instead of looking around the room, keep your eyes directed straight ahead or slightly downcast toward the floor (but don't bend your neck too far forward, which may cause discomfort). Try not to turn your head independently. Even when you turn around at the end of the walking path, keep your head in a straight line with your spine, as if you were wearing a neck brace. Move your whole body as one unit on the turn. Relax your shoulders.
|
View video of basic walking or download the video. |
Basic Walking Exercise
(Suitable for beginners)
- Observe the standing posture, noting "standing" for a few moments. This means to focus awareness on the posture of the body as you stand (for a more detailed description of how to observe posture, see Exercise 4). If this is difficult you can choose one point to focus on, such as the soles of your feet, being aware of the feeling of pressure from touching the floor.
- Before moving, note "intending to walk." (Don't skip this step).
- Slowly lift the right foot and place it down, taking one step. This should be a single fluid motion without breaks. Be aware of the entire arc of movement from beginning to end. As you do so, label the step "placing" (remember to label while the motion is happening, not afterwards). The left foot should not have moved and the left heel should still be on the ground. After placing the right foot down, stop completely for a moment.
- Slowly take a step with the left foot, noting "placing." Stop.
- Continue walking, making sure to stop completely after each step. Only move one foot at a time.
- When you reach the end of the walking path, place your feet together on the last step, noting "stopping."
- Note "standing" for two or three moments.
- Now you will begin to turn, in four steps. Note "intending to turn."
- Lift the toes of your right foot and pivot on the heel, turning to your right. At the same time, say the mental note "turning." The right heel should stay on the ground. Be sure to keep your head in line with your torso. The left foot should not move. Stop.
- Lift the left foot and place it down next to the right, while noting "turning". (The left foot doesn't pivot, but steps.) You should have moved about ninety degrees. Stop.
- Pivot on the right heel again, noting "turning." Stop.
- Lift the left foot and place it down next to the right, noting "turning." By now you should be facing in the opposite direction, having turned one-hundred-and-eighty degrees.
- Repeat steps 1-12 as many times as you wish.
That is the basic exercise. Next we'll give five variations in which each step is broken down into a series of smaller movements. Substitute any variation for instructions number 3 and 4 above. The rest of the exercise is the same.
A word of advice: don't try the variations until you are adept at the basic exercise. And don't proceed to the next variation until you've mastered the previous one, even if that takes a month, a year, or longer. (During an intensive meditation retreat, however, you might spend only one day on each variation.)
Remember that the "resting" foot should not come off the floor until the active foot has finished moving. Don't forget to stop completely after each segment of a step.
Advanced Walking Meditation
|
View video of the two-part step or download the video. |
The two-part step: (Lifting, placing). Lift the heel, noting "lifting" (the toes are still on the floor). Stop. Now move the whole foot forward and place it on the floor, noting "placing."
|
View video of the three-part step or download the video. |
The three-part step. (Lifting, moving, placing). Lift the whole foot straight up as a unit, noting "lifting." Stop. Move the foot forward, noting "moving." Stop. Place the whole foot down as a unit, noting "placing."
|
View video of the four-part step or download the video. |
The four-part step: (Heel up, lifting, moving, placing). Lift the heel, noting "heel up." Stop. Lift the whole foot straight up, noting "lifting." Stop. Move the foot forward, noting "moving." Stop. Place the foot down as a unit, noting "placing."
|
View video of the five-part step or download the video. |
The five-part step: (Heel up, lifting, moving, lowering, placing). Lift the heel, noting "heel up." Stop. Lift the whole foot straight up, noting "lifting." Stop. Move the foot forward, noting "moving." Stop. Lower the foot as a unit, noting "lowering"; stop when the foot is about an inch from the floor (be sure to stop completely here). Place the whole foot on the floor, noting "placing."
|
View video of the six-part step or download the video. |
The six-part step: (Heel up, lifting, moving, lowering, touching, placing). Lift the heel, noting "heel up." Stop. Lift the foot straight up, noting "lifting." Stop. Move the foot forward, noting "moving." Stop. Lower the foot, noting "lowering"; stop when the foot is about an inch from the floor. Touch the toes—only the toes—to the floor, noting "touching." Stop. Place the heel on the floor, noting "placing."
|
View video of hand motions or download the video. |
Exercise 3: Hand Motions
(Suitable for beginners)
This exercise is similar to walking (and rising-falling) in that you watch the body's physical movement. By focusing on a different part of the body, however, you give mindfulness a larger repertoire of objects, just as a weightlifter trains different muscles in rotation.
Since mindfulness sometimes gets "bored" or slows down when observing the same object for a long time (especially during a meditation retreat), changing to another primary meditation object can help mindfulness maintain strength and continuity. And because some of the movements here are shorter than in the other exercises, mindfulness is able to observe more "moments" in the same amount of practice time.
The hand motions exercise, performed while sitting or lying down, is especially useful for those who can't do the walking practice due to illness or disability. Note: you don't have to look at your hand. Just watch the movement with your mind.
Exercise A
- Adopt one of the sitting postures, or lie down. Place your hands on your knees, palms facing downward. (If lying down, place your hands at your sides, palms touching the floor).
- Slowly rotate your right hand laterally (to your right) until it is resting on edge, perpendicular to the knee. There should be no space between the fingers. Stop completely for a moment.
- Raise your hand straight up about eight inches. Stop.
- Lower the hand back down, stopping when it's an inch or two from the knee.
- Continue moving your hand down until the lateral side of the little finger touches the knee. Stop.
- Rotate the hand medially until the palm is resting on the knee. Stop.
- Repeat steps 2-6. Beginners should label the actions with the following mental notes: "turning," "raising," "lowering," "touching," "turning." Practice with one hand alone, anywhere from five to thirty minutes. Then change to the other hand, giving it equal time.
Exercise B
- Adopt one of the sitting postures or lie down. Place your hands on your knees, palms facing downward. (If lying down, place your hands at your sides, palms touching the floor).
- Slowly rotate your right hand laterally (to your right) until it is resting on edge, perpendicular to the knee. There should not be any space between the fingers. Stop.
- Raise your hand straight up about six inches. Stop.
- Pivoting from the elbow, slowly swing the hand and forearm inward toward the center of the body, stopping a couple of inches before touching the abdomen. The hand and wrist should remain in a straight line with the arm. The fingertips will now be pointing to the left and the palm will be facing the abdomen. Stop.
- Place the right hand against the abdomen. Stop.
- Rotate the left hand laterally (to your left) until it is resting on edge, perpendicular to the knee. Stop.
- Raise the left hand straight up about six inches. Stop.
- Pivoting from the elbow, swing the left hand and forearm inward toward the center of the body, stopping when a couple of inches from the abdomen.
- Place the left hand against the right. Stop.
- Now you will repeat the motions in reverse order. Swing the left forearm out until the hand is again above the knee. The hand and wrist should stay in a straight line with the arm. Stop.
- Lower the hand straight down, stopping an inch or two above the knee. The hand is still perpendicular to the knee.
- Continue moving the left hand down until the lateral side of the little finger touches the knee. Stop.
- Rotate the hand medially until the palm is resting on the knee. Stop.
- Repeat steps 10-13 with the right hand. You may label the movements with the following mental notes: for steps 2-5 and 6-9: turning, raising, moving, touching. For steps 10-13: moving, lowering, touching, turning. Practice this exercise anywhere from five minutes to one hour.
(Beginners can practice this for a few minutes before doing the rising-falling exercise. Intermediate or advanced students can practice it longer. We don't recommend beginners practice it for the entire meditation period, because posture is a more difficult object to observe than physical movement.)
In the previous exercises you had a moving object. Here you will observe a stationary object—the sitting posture itself (strictly speaking, however, movement is still present, because the mind moves). With your mind you are going to look repeatedly at the body's posture, as it appears in the present moment.
Adopt a comfortable sitting position. Now, focus your awareness on the posture of the body as it sits. (Pay no attention to the rising-falling motions.) The body is adopting a shape that differs from standing or lying down. This may seem obvious, but there is a difference between the vague, intermittent awareness of posture we have in daily life, an awareness interrupted by talking or thinking of a thousand things, and an attention that is wholly focused on that pose.
Just "look" with your mind's eye to know what the sitting posture is like—how it feels—in this very moment. If it's difficult to be aware of the whole posture at once, place your attention on one area, such as your hands in your lap. As you focus on the posture, label it with the mental note "sitting."
After focusing one time, do it again. The method is simply to observe the posture for one moment, let it go, and then immediately bring the mind back to the sitting posture again. This is done gently, with a light touch. Watch this action again and again—i.e., the action of bringing the mind to look at the sitting posture. Simply be aware of knowing sitting.
Each act or instance of focusing should be fairly quick, lasting about one-and-a-half to three seconds (but you don't need to time it, of course). Another way to think of it is that you focus for as long as it takes to say the word "sitting," or roughly as long as one inhalation. Then let go, and focus on sitting again.
What you should be aware of is not a visual image of the posture, but the kinesthetic experience or "feel" of it. There is a tactile feeling when you hold the back upright as you sit. You will also experience sensations of pressure at various points where your body contacts the floor or one leg presses against another. There will also be a feeling of contact where the hands touch each other.
Please don't misunderstand: you don't need to observe these various sensations individually, in detail. When practicing the exercise, don't try to examine them one by one. Look at the whole thing at once, in one fell swoop. Notice the feel of the entire sitting posture in the present moment. Then do it again in the next present moment. The meditator is aware of the whole posture each time with the aim of understanding that this is all there is to "sitting"—only a momentary group of sensations, nothing more. It is not stable. It is constantly changing. (Again, however, if it is difficult to be aware of the entire posture at once you may focus on a smaller area. Eventually you will be able to "see" the whole posture.)
Every time you focus on the posture, simultaneously label it with a mental note. Keep noting "sitting," "sitting," "sitting," from one moment to the next, over and over. Remember, it's a light touch-and-go. You don't need to explore the details of the sensation.
A reminder: don't look at the body with your eyes. Look with your mind.
As Achan Sobin suggests, it may help to think of the mind as a camera taking a series of snapshots. Take a "shot" of the sitting posture. Then take another snapshot of the same thing.
Further, when a photographer adjusts a camera lens, he focuses on one spot only; but the entire image comes out clear, not just the particular spot he was focusing on. (This is similar to focusing only on your hands instead of on the whole sitting posture).
A few paragraphs back we spoke about letting go after observing the sitting posture. Think of a chain of individual acts of focusing, and letting go after each one. In other words, what you should do is: Focus on the object and then forget it. Then immediately focus and forget it again. And again. And so on.
That's how we explain it in words. But in actual practice the "forgetting" or "letting go" is not a separate action. Letting go of the previous moment happens by itself every time the mind focuses on the posture again. So really it's a matter of: focus, focus, focus, in a series of moments. The meditator keeps taking consecutive "snapshots" of the posture, each one lasting roughly a couple of seconds.
Some reminders: don't mentally review your body one piece at a time. That would take too long and would pull the mind out of the present moment. And even though you use the mental label "sitting," remember to focus on the actual posture, not the word itself.
Every moment of our lives has two components: an object of awareness, and the mind. In this meditation exercise, the object of awareness is the sitting posture. So we have only: the sitting posture (material form) and the thing that is knowing it (the mind). The mind itself cannot adopt a posture. The mind doesn't have buttocks or legs to sit or stand with. It can only be aware of the body's posture.
There are a couple of Pali words worth remembering, because you will hear them over and over again in discussions about vipassana meditation. They are: "rupa" and "nama." Among other things, rupa means material form. Nama means the mind. In summary: the sitting posture is material form (rupa). The mind (nama) knows—is aware of—the form.
In conventional terms, we say "I am sitting." But in truth, a "self" cannot sit. The body is not a self. It is not your self sitting there. It is only matter, or rupa, sitting. And when the body sits, the mind experiences the posture as a group of temporary sensations, different from when the body is standing or lying down. That is the only way in which posture is experienced.
Everything we've said about observing the sitting posture applies to all the other bodily postures as well.
Intermediate or advanced meditators may practice this exercise for the entire meditation period, or for a few minutes before practicing the rising-falling exercise. Beginners may do the latter.
It is natural that strong emotions may sometimes come up during meditation. If that happens, don't assume you are practicing incorrectly. Emotions are valid meditation objects, too, objects of the fourth foundation of mindfulness. As objects of the mind they have no more nor less importance than bodily movement or posture. They are, however, more challenging to observe.
When an unpleasant emotion such as anger arises, don't get upset or try to suppress it. Nor should you try to look for a "better" object. The emotion is the truth of what is happening in the present, so just be aware of it.
As soon as you're aware of an emotion during meditation practice, label it with a mental note. For example, if you realize you're angry, label the emotion "anger, anger," for one or two moments. If you're depressed, note "depression"; if anxious, note "anxiety." Do the same with pleasant emotions: if you feel joyful, note "joy"; if peaceful, note "peace." You get the picture.
The insight meditation method is a middle path between 1) suppressing an emotion and 2) indulging it by expressing it in words or actions, trying to feel it more deeply, or thinking about it further. Whether an emotion is pleasant or unpleasant, the vipassana technique is simply to know it with impartial awareness, neither liking it nor wanting to make it go away. (Note: we are talking about during meditation. In daily life when expressing an emotion a meditator would do so with clear awareness, avoiding harmful speech or behavior.)
Don't judge the emotion or your self. If you're suddenly furious at someone, don't criticize yourself for getting angry. Instead, try to disengage the mind from any involvement in the anger and just watch it, as if you were watching it happen to someone on television, or viewing it under a microscope. As one teacher says, "See it, don't be it."
After noting the emotion for one or two moments, let go of it and gently bring your attention back to the primary meditation object. If the emotion is still so strong you can't focus on the primary object, repeat the procedure, noting the emotion longer if necessary. As soon as you can, return to observing the primary meditation object. Over time this method weakens anger, fear, depression, etc., since you are not "feeding" them with your thoughts and reactions. If you acknowledge an emotion when it appears but don't get hooked by it—don't get upset or intrigued—the emotion will gradually fade out.
A fire reflected in a lake cannot burn the water. Neither can emotions disturb the mind when you don’t get involved in them.
Don’t identify an emotion as your self. The fear or anger is not you, but only an impersonal phenomenon. Mentally pull back from the emotion and turn your awareness around to observe it. Now the emotion is just another object of your attention. Instead of "becoming" the emotion by getting caught up in it, you're looking at it from the outside.
When we're in the grip of a negative emotion we tend to believe it will never end. But emotions are no more permanent than thoughts. With continued practice you’ll find that you only have to wait and any emotion, whether pleasant or unpleasant, is bound to change.
In training the mind to know emotions as they really are, a meditator comes to realize that even strong grief, anger or fear can last only a moment before passing away. The emotion might come back; but even so it instantly passes away again.
An emotion is not something that belongs to you. The anger, sadness, or peace is only an impersonal phenomenon, a kind of mental weather that arises according to certain causes and then vanishes.
When you're able to separate your awareness from an emotion—able to leave the anger or sadness alone and become the observer—the emotion has no power to control you or cause suffering. The key is to be mindful as soon as it appears so you don't get hooked in the early stages.
But sometimes beginners are so overwhelmed by painful emotion they cannot practice effectively. In that case one of the following methods may help:
- Press the fist against the center of the chest (around the heart area) and repeat "knowing, knowing, knowing," being aware of the sensation of pressure from your hand. Keep this up until the emotion subsides.
- If you're sitting, get up and practice walking meditation.
- Temporarily switch to a concentration technique until you are able to resume vipassana practice. For example, you might repeat the word "Buddho," or another mantra (a mantra is a special word or phrase repeated aloud and focused on in concentration meditation).
Use the last method only when mindfulness is truly unable to cope with a strong emotion. Switching to a concentration technique should not be used as a means of avoiding unpleasant emotions. Sooner or later, mindfulness must learn how to handle emotional objects or we won't be able to make progress in insight.
In genuine vipassana practice we cannot avoid experiencing unpleasant emotions such as boredom, loneliness, fear, jealousy, anger, and so on. But much is learned from observing them mindfully, and gradually we're able to let go of them sooner. Whenever these emotions do arise they are weaker than they used to be, causing less and less suffering.
Pleasant emotions should also be known impartially, without liking or becoming attached to them. They, too, are impermanent. If we try to make a pleasant emotion last longer it will become a cause of frustration and unhappiness when, inevitably, it changes. Suffering results when we try to hold on to something that by its very nature cannot endure.
Most painful emotions arise from memory—hence the value of staying in the present moment. When recalling a painful memory—whether it be of a broken heart, or the loss of home, health, career, or loved one—the unpleasant event that triggered the feeling is no longer actually occurring in the present. Although the event is over the mind clings to it, which generates more suffering.
Or sometimes we worry about the future, fearing the loss of wealth, youth, or health that hasn't yet occurred. But none of these imaginings is real in the sense that none is actually happening at the moment we are thinking about it.
The painful events that happened in the past do not exist now. What might or might not happen in the future does not exist right now, either. Why should we let the mind drag us into unnecessary suffering?
It is not wrong to plan intelligently for the future, of course. But there's a difference between behaving responsibly—doing what needs to be done—and needlessly suffering over things that may never happen or are already gone; things which, in any case, we cannot control. Suffering about past or future events can only arise when we fail to stay in the present. So don't fast-forward or rewind.
In the previous section we explained that an emotion is not your self. Here we will talk a little more about not identifying objects as self.
Normally, the mind relates everything we experience in everyday life to a concept of selfhood. If we feel a pain in the body, for example, we automatically think, "my back hurts" or "my leg hurts." The painful body part is immediately identified as belonging to "me."
Although the false belief in self can’t be willed away, in vipassana practice we try to stop reinforcing it so that clear-seeing might arise naturally. We try to observe our bodies and minds without automatically identifying them as self, or as things that are part of us or belong to us. The aim is to let go of the feeling of "I" as much as possible and merely know the bare, phenomenal experience of each moment as it is.
During meditation practice, instead of: "I am moving," "I am hearing," "I am thinking," and so on, simply be aware of: moving, hearing, thinking. There's no need to mix the "I" into these experiences. In truth, there is no permanent agent executing the actions.
Try to separate your awareness and watch the mind-body process as if it had nothing at all to do with you. If there's a pain in your back or leg, label the sensation with the mental note "pain" or "feeling," without regarding it as "me" or linking it to a specific body part. When thoughts come, don't assume they are yours (but that's not to say they are someone else's. They don't belong to anyone). The Buddha taught there is thinking, but no thinker (the "knower" of the thoughts is only a momentary awareness that does not equal a self). Apply the same principle to all the other meditation objects. In truth, none of them truly belongs to you.
Sleepiness may bother you more during an intensive meditation retreat than in your daily practice. Nevertheless, it can be a frequent hindrance for beginners. Just be aware that sleepiness is present whenever it arises. You can mentally note it as "sleepiness." If it does not disperse after repeated noting, try some skillful antidotes: 1) open your eyes; 2) do walking meditation; 3) turn up the lights, or 4) splash your face with cold water. Cooling the room may also help. An excess of concentration can cause sleepiness. Be careful to follow the meditation techniques correctly so that mindfulness and concentration stay as balanced as possible.
It is important to understand what counts as a correct object for mindfulness. As we explained in "What is Vipassana?" the Four Foundations of Mindfulness are the appropriate objects for insight meditation. Once again, these are:
- The body: i.e., bodily motion and posture.
- Feelings: painful, pleasant and neutral feelings (these don't refer to emotions).
- Consciousness: for example, the condition of the mind with or without hatred, delusion, etc.
- Dhamma objects: this group includes the five mental hindrances: lust, anger, sleepiness, restlessness, and doubt, as well as the five sense-impressions: sights, sounds, tastes, smells, and touches. Some objects in this group are mental, some, material.
Reduced to their essentials, the Four Foundations of Mindfulness are simply material phenomena (rupa) and mental phenomena (nama). But this might sound as if anything whatsoever can be a valid object for mindfulness. Not quite.
A valid object for mindfulness must be something that actually exists, and is directly perceived in the present moment. It isn't something that used to exist, or will exist in the future. As Ven. Sujìva points out, it isn't imaginary, conceptual, or remembered. Nor is it a name or a word.
Let's talk for a moment about mental phenomena, since these are the hardest to understand. In the context of vipassana meditation, some mental forms are "real," such as the intention to move the body, or a feeling of aversion or desire. They are valid objects of mindfulness if we observe them at the very moment in which they arise (instead of remembering them afterwards). Mental phenomena that are not real in the same sense are names, words, memories and fantasies.
But we should understand that during vipassana practice we won't always be able to focus on a "real" or "correct" meditation object, even if we try hard to do so. Sometimes we'll get lost in memories, or find ourselves planning what we're going to do the next day. We might realize we've been focusing on a word instead of on the actual phenomenon being experienced. At times the mind will get caught up in imaginary constructs. That's to be expected, and it's all right. We shouldn't get upset when it happens. As soon as we're aware, we can begin again from that point. All we need to do is label the event with an appropriate mental note, such as "memory," "planning," or "imagining," and lightly bring the mind back to the main meditation object.
In daily life our minds become obsessed with some forms and try to get rid of others. Inevitably we like good feelings, beautiful sights, pleasant sounds, delicious tastes, and fragrant smells, and dislike unpleasant ones. Partiality reigns. Yet vipassana is the ultimate democratic technique. Whether good or bad in conventional terms, all objects are treated equally during meditation practice.
But it's not enough just to know which objects to observe. Having identified the appropriate meditation objects, we need to understand precisely how to observe them.
The way of focusing on objects in vipassana practice differs from that of concentration meditation, and it's important to understand the difference. In every present moment, the mind makes contact with, or knows, an object. In other words, the mind, the knower, experiences an object.
In order to have a complete foundation for mindfulness, a meditator observes both the mind and its object in each moment. (But that doesn't mean observing two objects at the same time. As we said earlier, a meditator observes only one object at a time.)
Put another way, a meditator observes the knowing. Or we could say, he observes: the mind in the act of knowing the object. It isn't as complicated as it sounds. As soon as we're aware of knowing an object, we'll automatically be aware of the object, too. Consciousness can't know itself. It has to have something outside itself to be aware of. The act of knowing cannot happen without some object "x" to be known.
So when we say, for example, "be aware of the rising motion," what should be observed is, "knowing rising," or "the-act-of-knowing-rising." That is true for all meditation objects, not just the abdominal movements. The complete unit of observation is always "the-mind-knowing-x" or simply, "knowing x."
There is another important aspect to observing objects in insight meditation. Every object we observe during vipassana practice arises, persists, and then ends, and this entire development occurs within one moment. This can be illustrated by a single step of the foot in basic walking meditation. Every step has a clear beginning as you lift the heel, a middle phase as the foot travels forward, and an end as you place the foot down (these three phases segue into each other fluidly). The entire progression happens in one moment, and our attention should be sustained through the whole arc, from the instant of lifting the heel all the way to the end. After the movement ends we let it go and focus on the beginning of the next object. If we want to keep walking, we would observe the beginning of the next step.
Although not all meditation objects will have such clearly distinct phases as a single step does, we can use this example as a paradigm of how to observe other objects, too, even mental events. Even though we won't be able to do it clearly at first, our eventual aim during meditation should be to observe every object in this manner, knowing it with mindfulness from the instant of its arising all the way through to its ending, right in the present moment. But remember, the cycle of development we're speaking about occurs within a single moment, a single instance of noticing, not across several moments. So the duration of the whole process is very short—no more than two or three seconds, sometimes much less. If you're a beginner, this will probably sound quite puzzling. Please don't worry. As you gain experience practicing meditation the meaning will gradually become clear. This is one of many aspects of meditation that only truly becomes clear with practical experience. But having an intellectual understanding beforehand can help point you in the right direction.
To summarize how to observe objects in vipassana practice, we should: 1) observe realities, not concepts or names; 2) be aware of knowing each object; and 3) observe each object from beginning to end as it arises and disappears in the present moment.
In insight meditation, objects should be observed momentarily. What does "momentarily" mean? During meditation you should let go of an object after focusing on it once. In other words, after observing something for one moment, mentally let it go and then move on to the next object (the "next object" might be a completely different form, or it could be the same thing again if it's still occurring, like a feeling of itchiness lasting a few minutes). An insight meditator focuses moment-by-moment. As we said before, the motto is: "Focus and forget it," or "know and let go."
Please don't misunderstand: we don't mean you have to change to a different meditation object every single moment. Don't worry if you're a little confused at this point. We'll explain further.
Some meditation objects only last a few seconds. Take the exercise of watching the rising and falling movements, for example. We watch the abdomen rise, and then the rising movement ends, only to be immediately replaced by the falling movement, which is a different object.
Even if you want to observe the rising movement longer, you can't, because it doesn't last more than a couple of seconds. After watching it for a moment you have to change to observing the falling movement. And then after a couple of seconds the falling movement changes to rising. And so on. That's why you can't observe the rising movement or the falling movement longer than one moment at a time.
But what if you're watching a meditation object that stays the same for a longer time? How would you observe it from moment-to-moment? Let's take the example of sound. Imagine that while observing the abdominal movements you're distracted by the sound of a car alarm going off in the street below. The noise continues for at least five minutes. You would observe hearing the sound for one moment, and then drop it. But since the sound would still be happening, you would observe the same sound a second time, letting it go again—and so on, in a series of acts of knowing. (Note: that doesn't mean you have to keep observing the sound until it’s over. If the sound no longer disturbs your mind after noting it once or twice, there'd be no reason to continue focusing on it. You could then return to watching the abdominal movements).
The same thing applies to the other meditation objects. Students sometimes get confused because we say a meditation exercise such as the sitting posture can be practiced as long as forty-five minutes. In that case, wouldn't a person focus on the sitting posture for the entire meditation period?
In ordinary terms, yes. But again, we need to understand how to focus from moment to moment during vipassana practice. Although for the sake of communication we can talk about observing the sitting posture for three-quarters of an hour, what we are actually doing during that time is knowing sitting for a moment and letting it go, knowing sitting and letting go, knowing and letting go, over and over again. It's the same as in the example of the car alarm. Each instance of focusing lasts only a moment. During those 45 minutes many individual acts of noticing occur, and the mind starts over again with each one. Furthermore, in between moments of knowing the sitting posture there may be times when we notice a secondary object such as a thought, a sound, or an itch, whenever those things pull our attention away. During a single meditation session mindfulness may jump back and forth from one object to another many times.
Most of us have seen jugglers at festivals or street fairs, and their touch-and-go skill is a perfect example of how to focus on objects in meditation. A juggler has to concentrate in order to catch each ball as it comes around. He can't let himself get distracted by a noise in the crowd or allow his gaze wander. He must know where to put his attention, and then keep his mind on that spot. Likewise, a meditator has to concentrate or he will get distracted from whatever object is appearing in the present moment. That's the "focus" part of the equation.
Now for the "forget it" part: as soon as a juggler catches one ball he lets it go immediately or his hand won't be free to catch the next one. He keeps his attention moving, "jumping" from one object to the next. In the same way, as soon a meditator notes an object he drops it, or else he'll miss the next present moment. His attention doesn't cling to anything. Like the juggler's, his experience is touch-and-go, touch-and-go.
In the ultimate sense, reality is a series of different phenomena coming into being and dying out one after another, very fast. For that reason our attention has to keep moving to the next thing in order to keep up. Mindfulness is always moving to know the next object that appears. It drops the last moment in order to know what is arising in the next present moment.
In this exercise your attention switches back and forth between two primary meditation objects. The first object is the sitting posture itself, as described above.
For the second object, find a point on your right or left buttock where you can feel the contact of the floor. That will be the touching point. The idea is to "touch" this spot with your mind—i.e., to bring your awareness to focus on that point, momentarily. During this exercise ignore the rising-falling motions.
Adopt one of the sitting postures. As described above, observe the sitting posture for one moment, focusing, if you wish, on your hands in your lap. In the next moment move your mind to the touch point and observe the contact. (Note: we are referring to mental contact, not physical—the contact of the mind "touching" the point.) Your attention will "jump" from the sitting posture to the touch-point.
Keep alternating between them from one moment to the next, noting, "sitting, touching, sitting, touching, sitting, touching." Focus on each object approximately the same length of time—about one-and-a-half to three seconds, or roughly as long as it takes to say the mental note. (Another way to think of it is: focus on sitting for roughly the duration of one rising motion of the abdomen. The same with touching.) Don't try to be precise about the length of each moment. Just observe the posture for as long as it takes to say "sitting" a little more slowly than normal and you'll be fine. That is one moment. Then note the touch point for about the same length of time, saying "touching." And back to knowing sitting again, one time. Then touching, for one moment. Back and forth. Practice this exercise anywhere from twenty minutes to one hour.
During a meditation retreat, observe the touch point on the right side of the body for one meditation session and the left side the next, alternating sides throughout the day. In your regular daily practice you can do the left side one day, the right side the next.
Exercise 6: Rising-Falling-Sitting
Once you feel comfortable with the rising-falling and sitting-touching exercises individually, you can begin to combine them as in this exercise. Like a juggler adding another ball, you add a third object to give mindfulness more "work" to do. If you have noticed a pronounced gap between the rising and falling movements in Exercise 1, you're ready to add "sitting." (But that doesn't mean you have to practice this exercise all the time from now on. Even advanced meditators still use Exercise 1 as their main meditation exercise).
Adopt one of the sitting postures. Observe one rising and one falling motion of the abdomen. Before breathing in again, focus on the sitting posture for one moment, taking a mental "snapshot" of the pose. Eventually the duration of these three moments should be roughly equal, but when first learning the exercise they are often uneven. That's all right, as long as none of the moments is longer than about three seconds. (Note that sitting is observed in between falling and rising, so do not breathe in while observing sitting.)
After observing the sitting posture one time, start over with rising again. Keep going in sequence: rising, falling, sitting; rising, falling, sitting. Use the corresponding mental notes: "rising," "falling," "sitting."
At first you might have to hold your breath for a moment in order to fit the sitting object between the old falling and the new rising motion. But with practice there will be a natural space long enough in which to observe the posture. Practice this exercise for a minimum of twenty minutes, working up to forty-five minutes or one hour.
Exercise 7: Rising-Falling-Sitting-Touching
Once you feel comfortable with exercises five and six you can add a fourth object, combining the rising-falling and sitting-touching exercises. Adopt one of the sitting postures. Observe one rising and one falling motion of the abdomen. Before breathing in again, observe the sitting posture for one moment. Then (also before breathing in) focus on the touch point at the buttocks. In total there are four objects observed in sequence: 1) rising, 2) falling, 3) sitting, 4) touching. These should be of roughly equal duration. Do not breathe while observing sitting and touching. After you note touching, start over with rising again.
Continue the sequence, using the mental notes "rising," "falling," "sitting," "touching," if you wish. Observe each object for about one-and-a-half to three seconds each time (or about as long as the duration of one rising motion). At first, as in Exercise 6, you may have to hold your breath slightly in order to fit sitting and touching between the falling and rising motions. But with practice, conditions will balance by themselves and you will be able to fit in all four objects without having to consciously adjust your breathing.
|
View video of lying down or download the video. |
Exercise 8: The Lying Down Posture
(Suitable for beginners if practiced a short time only, or when ill)
During a meditation retreat, when devoting the entire day to vipassana, it's important to practice in all four postures: sitting, walking, standing, and lying down. Not that you should spend equal time in each pose. Typically, sitting and walking are practiced anywhere from thirty to sixty minutes at a time, standing and lying down, from five to fifteen.
Only an advanced meditator can practice lying down for long periods without getting sleepy or losing mindfulness. And although standing can be practiced longer, it's usually too uncomfortable for the novice to maintain for long periods.
In the beginning, therefore, unless you are ill, do not exceed the fifteen-minute maximum for lying down. Change into the reclining pose slowly and mindfully, following the step-by-step technique of stopping between movements.
As you change from standing to lying down, note each small action: observe the sensation of contact as you bend each knee to the floor and lower the torso. Move the legs one at a time, placing one on top of the other. Note the contact there, too. Label these actions with the word "moving."
Lie on your side, with the arm closest to the floor extended under your head or on the floor in front of the chest, the uppermost arm resting against the side of the body. (You may place a pillow under your head).
Now observe the lying down posture, taking repeated mental snapshots, as with sitting. As you do so, note "lying" or "lying down." Ignore the rising-falling motions.
For a more detailed explanation of how to observe bodily posture, please see Exercise 4.
Alternatively, instead of the posture itself you can observe the rising and falling abdominal movements (but do not also watch the posture. Choose one or the other). You can also practice the hand motions exercise while lying on your back. In that case, ignore the posture and abdominal movements and observe only the movement of the hands.
|
View video of the standing posture or download the video. |
Exercise 9: The Standing Posture
(Suitable for beginners)
As with sitting and lying down, the meditation object here is the posture itself. You might want to practice this exercise for five, ten or fifteen minutes before doing walking meditation. Stand straight with the arms held in front of the body, one hand clasping the wrist of the other; or clasp the hands behind your back.
Your eyes may be open or closed. If you open your eyes, don't pay attention to what you're seeing. Let your attention stay with the kinesthetic "feel" of the posture. If you wish, you may focus on one area of the body, such as the soles of your feet. Now take a mental "snapshot" of the posture, noting "standing." Ignore the rising-falling motions. Just keep observing standing, being aware of knowing the posture from moment-to-moment.
For a more detailed explanation of how to observe posture, please see Exercise 4.
Some students experience strong feelings of rapture, peace or bliss at a certain stage in meditation practice. If this happens to you, don't get excited. Just note the bliss or peace as you would any other object. Don't cling to the feeling (but neither should you try to avoid it). Like everything else, blissful or peaceful feelings should be known with impartial attention. Then let them go.
As one teacher cautions, meditators who fail to notice pleasant feelings impartially, thinking, "'After all, these are good things,' will ultimately find themselves in difficult straits, unable to advance in meditation." (Ven. Mahathera Matara, The Seven Stages of Purification, p. 39).
There's nothing wrong with good feelings; but it's their nature to pass away. Trying to make them last will only disturb your mind and prevent you from gaining the higher levels of insight.
Even if the bliss is stronger than any happiness you've ever known, you shouldn't mistake it for enlightenment, or even an advanced level of insight. Generally speaking, blissful feelings arise at a relatively early stage in vipassana practice. The peace that comes from maturing insight, which is independent of the presence or absence of pleasant feeling (sukha vedana), is quite different from the blissful states that may occur in the earlier stages of vipassana-knowledge. The latter are temporary, pleasurable feelings which alternate with neutral or unpleasant feelings. When the pleasant feeling ends the meditator may be unhappy or irritated because he wants to have the feeling again. But a highly experienced vipassana meditator is able to transcend attachment to feeling so as to be free and perfectly content no matter what kinds of sensations are present, even unpleasant ones. The remarkable freedom and ease of nonattachment are superior to the happiness of pleasant feelings that arise and pass away.
Be aware that a pleasant feeling during vipassana meditation doesn't necessarily mean you are practicing correctly (nor does an unpleasant feeling mean the opposite). Good or bad feelings are not reliable guides in insight meditation. Neither are your moods and desires. The important thing is whether mindfulness can know and let go of whatever is happening in the present moment, be it good or bad, even if the "thing going on" is anger, anxiety, pain, or another unpleasant state.
Your ability to simply be aware, with equanimity, of whatever is happening now, is the yardstick by which to judge your practice. So don't become self-satisfied if you feel blissful, or discouraged if your meditation is uncomfortable. Just ask yourself, "Am I aware of what is going on from moment to moment, whether good or bad, and letting it go, without clinging to it or feeling aversion?" If the answer is yes, be assured you are getting benefit that will increase day by day.
But some people, when angry or worried, say, "I'm too upset to meditate right now." They think we should wait to practice vipassana until after the mind has calmed down. That's like a patient with a life-threatening infection claiming he is too sick to take medicine. He'll take it after the infection is gone. By that time, of course, he wouldn't need it, having died already. Vipassana practice is medicine for the mind. If our minds were already calm and free of delusion, we wouldn't need it.
Although there will be days when you won't want to meditate, don't give in to your moods and practice only when you feel like it. Vipassana should be regarded as something necessary, as essential as taking medicine when we are sick, or brushing our teeth every day. We don't do those things because they are great fun, but in order to keep the body healthy. Meditation makes the mind healthy. There is only one time to do it: today.
As with any other skill, progress in vipassana meditation requires self-discipline. It's no different from excelling in a sport or playing a musical instrument. No one would expect to become a concert pianist, for example, if he only practiced the piano when he really felt like it.
Perhaps you feel peaceful when doing sitting meditation, but not when doing the walking exercise. You might decide to give up walking because it doesn't "work" for you. Or perhaps you sit down to meditate for forty-five minutes, but after a quarter of an hour you switch to a different technique because you feel bored. "Maybe the other exercise will make me feel peaceful or happy," you think. The grass always looks greener, doesn't it?
We're not implying you need to practice every exercise on this website, or always meditate forty-five minutes. The point is to be scrupulously honest with yourself and let intelligence, instead of your momentary desires and moods, guide your decisions. Don't allow desire to control your meditation practice.
But how should you decide which exercises to practice? Although occasionally it's good to try a new exercise as a way of testing mindfulness, for the most part you should stick with the exercise(s) in which mindfulness is able to observe the meditation object most clearly. If you practice the more advanced exercises before you're ready, you'll only become frustrated and won't progress as quickly. Mindfulness has to build up gradually. As we said before, beginners are encouraged to start with the rising and falling and/or the hand motions exercises. They can also practice the basic walking step, and some of the other exercises for short amounts of time as noted.
|
View video of paying respect or download the video. |
Paying Respect to the Teachings
(Optional)
In the Buddhist tradition it is customary to pay respect to the Buddha and his teachings at the start of each meditation session. Non-Buddhists may skip this step.
The instructions for paying respect are as follows. (These movements should be performed slowly and mindfully):
- Begin with hands on the knees, palms facing downward.
- Slowly rotate the right hand laterally (to your right) until it is resting on edge, perpendicular to the knee. There should be no space between the fingers. Stop completely for a moment.
- Raise your hand straight up about seven or eight inches. Stop.
- Without changing its position relative to the arm, slowly move your hand toward the midline of the body until it's in front of the chest. Stop.
- Move the left hand as you did the right. Rotate it laterally (to your left) until it's perpendicular on the knee. Stop.
- Raise the left hand straight up about seven or eight inches. Stop.
- Bring the left hand toward the midline of the body, until it's in front of the chest. Stop.
- Press the palms together, fingertips pointing to the ceiling. Stop.
- Bend the head in a small bow, thinking, "May I pay respect to the Buddha (wisdom), the Dhamma (ultimate reality), and the sangha (the company of enlightened beings)." Or devise your own phrase to express something like this: "May I pay respect to the teachings and the teachers of vipassana meditation, beginning with the Buddha himself."
- Now you will repeat the above motions in reverse order (with one small difference). Raise your head. Stop.
- Move the right hand back out until it's poised over the knee. The hand is still perpendicular. Stop.
- Lower the hand until it's an inch or so above the knee. Stop.
- Bring the right hand straight down until the lateral side of the little finger touches the knee. Stop.
- Rotate the hand medially until the palm is resting on the knee. Stop.
- Repeat steps 11-14 with the left hand, making sure to stop after each movement.
The way to be free of suffering, the Buddha said, is to develop ourselves in three areas: morality, concentration, and wisdom. The last two aspects are addressed by meditation practice. But these in turn rest on a foundation of morality.
Without some degree of restraint in our behavior, the mind will be too troubled to concentrate and meditate effectively. By adhering to a code of wholesome behavior, however, meditation practice will progress smoothly.
Morality, called "sila" in Pali, is addressed by the precepts. The following five precepts are the Buddhist guidelines for the layperson. We encourage everyone to follow them. Note that the fifth precept is to abstain from alcohol. That doesn't mean you cannot practice vipassana meditation unless you give up drinking. You might begin by following the first four precepts while gradually decreasing your alcohol intake. You could add the last precept whenever you felt ready. The reason for this precept is to avoid the loss of mindfulness leading to unwholesome speech and behavior which often occurs with drunkenness and recreational-drug use.
The precepts below are given in Pali first, then English, but it's fine to say them in English only. If you wish you can repeat these precepts aloud every morning while concentrating on them with your eyes closed. If you happen to break a precept, take all five precepts over again. And be sure to forgive yourself. Nobody's perfect.
The Five Precepts
- Panatipata veramani sikkhapadam samadiyami. I take the precept to refrain from killing any creature (including insects).
- Adinnadana veramani sikkhapadam samadiyami. I take the precept to refrain from stealing.
- Kamesu micchacara veramani sikkhapadam samadiyami. I take the precept to refrain from sexual misconduct (i.e., sexual relations with someone other than my spouse, or with a married, engaged, underage person, etc.). Any sexual action that hurts another can be considered sexual misconduct.
- Musavada veramani sikkhapadam samadiyami. I take the precept to refrain from lying and harmful speech (the latter includes harsh speech, gossip, and idle chatter).
- Surameraya majja pamadatthana veramani sikkhapadam samadiyami. I take the precept to refrain from consuming alcohol and using recreational drugs, which lead to carelessness. (This does not include drugs used as medicine.)
Meditators usually take the eight precepts during vipassana retreats. You can also take them on so-called uposatha days (days of the half, full or quarter moon), weekends, or any time you choose.
The Eight Precepts
- Panatipata veramani sikkhapadam samadiyami. I take the precept to refrain from killing any creature (including insects).
- Adinnadana veramani sikkhapadam samadiyami. I take the precept to refrain from stealing.
- Kamesu micchacara veramani sikkhapadam samadiyami. I take the precept to refrain from sexual misconduct (i.e., sexual relations with someone other than my spouse, or with a married, engaged, underage person, etc). Any sexual action that hurts another can be considered sexual misconduct.
- Musavada veramani sikkhapadam samadiyami. I take the precept to refrain from lying and harmful speech (the latter includes harsh speech, gossip, and idle chatter).
- Surameraya majja pamadatthana veramani sikkhapadam samadiyami. I take the precept to refrain from consuming alcohol and using recreational drugs, which lead to carelessness (this does not include drugs used as medicine).
- Vikalabhojana veramani sikkhapadam samadiyami. I take the precept to refrain from eating after noon.
- Naccagita vadita visukadassana mala gandha vilepana dharana mandana vibhusanatthana veramani sikkhapadam samadiyami. I take the precept to refrain from entertainment, beautification and adornment (watching movies, listening to music, etc., using cosmetics, and wearing jewelry).
- Uccasayana mahasayana veramani sikkhapadam samadiyami. I take the precept to refrain from sleeping in a very soft, luxurious bed.
Unlike some types of meditation, in vipassana we don't focus on a special object like a candle flame or a colored disc. No external props are used. Our own bodies and minds provide all the meditation objects needed. And since vipassana can be done while moving the body, advanced students can practice mindfulness anywhere, under any circumstances, not only during formal meditation sessions. (However, mindfulness in daily life differs in some ways from the mindfulness of formal meditation practice. For an explanation, please see the section, "Mindfulness in Daily Life" at the end of this article.)
Based on the idea that vipassana is a more natural practice than other types of meditation (since mindfulness can be applied at any time), some students develop wrong ideas and expectations about it. For example, some meditators dislike the hand motions and advanced walking exercises on the grounds they are not "natural" enough. This is to become too attached to a concept of what insight meditation should be. Actually, there is no qualitative difference between a spontaneous movement and the slower, deliberate movements of the hands and feet in the step-by-step vipassana method. Bodily motion has the same properties whenever it appears. But there is an important practical difference: Most beginners gain mindfulness more quickly when observing slower, step-by-step movements, which is why we teach this form of vipassana. Also, it is easier to see the cause-and-effect relationship between mind and body with this method.
Any form of meditation is merely a technique for training the mind, not an end in itself. When we think about it, there is no such thing as a wholly natural method, because a method is by definition applied deliberately. The most natural technique is still a technique.
Even with the most natural method, the student doesn't sit back and let nature take its course. Effort must still be made to go against the stream of habit and bring the mind back to the present moment, over and over again. The meditator doesn't use force, but gentle persistence. That persistence is right effort, which is necessary because getting lost in thoughts of the past and future is the most natural thing in the world.
That said, it can be helpful to practice more naturally at times in order to test mindfulness, as long as we understand this technique correctly and don't cling to it. This method is especially helpful for advanced meditators undertaking intensive retreats. Toward the end of a meditation retreat of several weeks or months, Achan Sobin often tells students to alternate between the step-by-step technique and a more natural way of meditating. When practicing the latter method the student does not adopt a special posture. He sits and walks as he would in daily life, except a little more slowly. The student follows this method for one or more days and then switches to the step-by-step technique. He continues to alternate between the two methods until a high level of insight arises. But again, this back-and-forth approach is usually applied during intensive retreats of all-day meditation, not when only practicing an hour or so per day.
We do not recommend the natural method for beginners, because their mindfulness and concentration are weak. Most beginning meditators progress more quickly with the step-by-step method.
The Buddha taught that until we completely eliminate the unwholesome tendencies in our minds any system of mental purification will go against some of our inclinations. Once the mind is fully purified, however, we'll no longer need to meditate. Mindfulness will arise spontaneously. Then we'll truly be able to live naturally without experiencing—or causing—any mental suffering.
|
View video of mindful eating or download the video. |
During an intensive vipassana retreat you should try to maintain mindfulness twenty-four-hours per day, except when sleeping. Do everything slowly. Be as aware as possible during every activity: when walking to the hall, using the bathroom, making your bed, getting dressed, opening a door, brushing your teeth, drinking water, and so on. If you don't maintain continuity of awareness you'll be starting from zero again and again. But mindfulness increases exponentially when it's continuous. That principle applies to mealtimes as well.
Mindful eating is no less important than sitting meditation, because insight-knowledge can arise at any time. During a meditation retreat, instead of viewing mealtimes as opportunities to take a break and ease up on mindfulness, regard them as golden opportunities for practice. The desire in the mind is often much clearer during meals than at any other time of day. To see desire in action is an important aspect of vipassana meditation.
Some preliminary instructions for mindful eating: since it takes much longer to eat a meal this way, be sure to allow at least one to two hours. Walk to the table slowly and mindfully. Note any tendency to hurry, induced by the desire for food. If you are carrying a plate, put it on the table before sitting down, noting "placing." Then with the hands clasped in front of the body, stand beside the chair for a moment, noting "standing."
Next, extend your hand and touch the chair back, being aware of the feeling of contact as your hand touches the chair. Pull the chair out. Move your hand back to your body and clasp the hands together again. Note "intending to sit," and then sit down slowly. Stop moving for a moment, and then scoot your chair toward the table. Adjust the chair until you're comfortable.
During a meditation retreat it is customary to pay respect before the meal, expressing gratitude for the food. Place your hands in the "respect" position (see "Paying Respect to the Teachings"). Next, say something like this, either silently or aloud: "May this food give me energy to continue practicing mindfulness from moment-to-moment, until I am completely free of suffering. May I share the merit I've gained from meditation practice with the person who prepared this food, and with all beings."
Then bring your hands back from the "respect" position step-by-step, ending with your palms on your knees. Except for paying respect, meals are conducted in silence during an intensive meditation retreat.
Instructions for Mindful Eating
- Look at the food, noting "seeing."
- Notice whether or not you are hungry.
- Note "intending to move."
- Turn your right or left hand laterally until it's resting on edge, perpendicular to the knee. Stop.
- Raise your hand straight up until it's more or less at table-height. Stop.
- Move your hand forward toward the fork or spoon. Stop.
- Grasp the fork, being aware of the sensation of touch as you do so. Stop.
- Lift the fork. Stop.
- Move the fork toward the food. Stop.
- Place a bite of food on the fork. Stop.
- Slowly raise the fork to your mouth. Stop.
- Touch the fork to your lips. Stop.
- Open your mouth. Stop.
- Put the food in your mouth. Notice the feel of your lips touching the fork, and the contact or temperature of the food on the tongue. Don't let yourself chew yet. Stop.
- Lower your hand slowly. Stop.
- Place the fork on your plate. Stop.
- Return your hand to your knee. (You still haven't begun to chew.)
- Chew the food. Flavor will appear. Mentally try to isolate the flavor from the tactile mass of the food, the movement of your mouth, and any desire that arises. Flavor is its own object, separate from all these things. If the flavor is strong you should focus on it. But if the flavor is bland, focus on the movement of the jaw or tongue. Note "moving," "tasting," "desire," "touch," and so on, as appropriate.
- As you swallow, note "swallowing."
- Be aware your mouth is empty.
- Notice whether or not you feel full.
- Note the intention to take another bite.
- Repeat steps 1-22. (Although mental notes were not given for all the steps, you may wish to add them, labeling "moving" for steps 3-5 and so on.)
If you need both hands to cut something, focus your attention on one hand only. Apply the same step-by-step procedure to drinking: observe the intention first; extend your hand; grasp the cup; move the cup toward you; take a sip of water; and finally, bring the cup back to the table, stopping completely after each action.
When mindfulness and insight are strong you may not recognize what you are eating. This experience is a revelation. Instead of green beans or rice on the plate, you see only color. Rather than meat or cheese, you taste an unnamed burst of sensation. This experience is difficult to describe, but if it happens you will immediately understand what we are talking about.
The step-by-step eating technique is intended mainly for meditation retreats. During daily life it usually isn't practical to eat this way, except on special days or when you have free time on the weekends. When you are unable to eat in the step-by-step manner just use general mindfulness to be aware of what you are doing as you eat the meal.
Sharing Merit and Lovingkindness (Metta)
At the end of a meditation retreat it is customary to share "merit" and loving-kindness (metta) with all beings so everyone may benefit from your meditation practice. You can do this after your regular morning or evening meditation, too. Say whatever words seem suitable to you, such as: "May I share the benefit of my vipassana practice with all beings, so they may be free of mental and physical suffering. May all beings be well and happy." Or, with your hands in the "respect" position, you can repeat the traditional Pali sequence, given below.
The Pali Formula for Sharing Lovingkindness:
Sabbe satta (sah BAY sah TAH)
Avera hontu (AH ver ah hone too)
Sabbe satta (sah BAY sah TAH)
Abayapajjha hontu (ah bai YAH pah jah hone too)
Sabbe satta (sah BAY sah TAH)
Anigha hontu (ah nee gah hone too)
Sukhi attanam (sook ee ah tah nang)
Pariharantu (par ee har ohn too)
Translation: May all beings living in the ten corners of samsara, undergoing the suffering of birth, aging, sickness and death, be happy and free from hatred and anxiety. May they be happy and free from all physical and mental suffering.
Idham no (ee dam no)
Natinam (nah tee nam)
Hontu (hone too)
Sukhita (sook ee tah)
Hontu yatayo (hone too yah tai yo)
Translation: I share this merit with my family. May they be well and happy.
Idam me (ee dam may)
Punna bhagam (puhn yah bah gahm)
Sabbha (sah bah)
Sattanam (sah tah nam)
Demi (day mee)
Translation: I share this merit with all beings. May all beings be well and happy.
Idam me (ee dam may)
Vipassana (vih pah sah nuh)
Kusalam (koo sah lahm)
Asava (ah sah vah)
Khayavaham (kai yah vuh hum)
Hotu (Ho too)
Translation: May the merit from my practice of vipassana eliminate the desire, hatred and delusion in my mind.
After saying these words it is traditional to bow three times: first to the Buddha (wisdom), second to the Dhamma (ultimate truth) and third to the sangha (the company of enlightened beings).
Many students ask us how to practice vipassana in daily life. In order to understand how to apply mindfulness to our everyday activities we first have to know that in daily life meditators focus on a different type of object than in formal meditation.
Ideally, the objects of mindfulness during formal meditation are bare sense-data: mere sensations of bodily movement, sound, color, feeling and so forth, without names (the mental notes have a different purpose than the ordinary names of objects, and are only used as a temporary training device). We don't add any descriptions to the pure sensations. Because of this, an advanced meditator may not recognize what he is seeing, hearing, or otherwise experiencing. For example, when hearing a sound he will clearly be aware of the act of hearing, but he won't identify the noise as a barking dog, a motorcycle engine, or whatever it may be in ordinary terms (don't worry: the recognition of sense-perceptions returns as soon as one stops meditating).
But in daily life we have to be aware of the names of things or we'd be unable to function. It is necessary to recognize and distinguish one sight or sound from another, and apply the correct language to each. We have to know, for instance, that a certain sound signifies a ringing phone, not the call of a bird. And we often have to think in much more complex, abstract ways. Even a simple task like preparing a meal would be impossible when perceiving pure color-patches. When fixing supper we have to distinguish a tomato from a carrot, a knife from a spoon, and so on.
In addition, during daily life we almost always have to move faster than we do in formal meditation, and so we don't have an opportunity to observe our bodily movements clearly, step-by-step, as in formal meditation practice.
Most of the time in ordinary life, then, we perceive what is called "conventional reality," which simply means the familiar, everyday world of named things. This itself becomes the object of awareness.
During your daily activities, just be aware of what you are doing in the ordinary sense. For instance, "now I'm washing dishes," "now I'm typing," "now I'm walking," "now I'm driving," "now I'm talking," "now I'm cutting vegetables for dinner," and so on. You don't have to verbalize it. Just swing your attention back to whatever is happening right here in the present. Focus on the general activity at hand rather than getting lost in memories or fantasizing about the future. Throughout the day keep bringing your mind back to the present, asking yourself, "What is happening right now?" or "What am I doing now, this very moment?" At times, if you find it helpful, you can label your activities with a mental note.
Even in daily life, however, there will be times when you aren't performing an activity and don't need to engage in conceptual thinking, such as when riding on the bus or waiting in line at a store. You can take advantage of those moments by being mindful of the rising-falling movements of the abdomen or observing your posture, even if only for a minute or two.
To sum up, mindfulness in daily life is mostly a matter of general awareness, dotted with short periods of focusing on bare sense-impressions as conditions allow.
However, in daily life it is usually more important to focus on the mind rather than on bodily movements, because the defilements that might cause wrong speech or behavior arise in the mind, not the body. Wrong behavior isn't much of a concern during vipassana practice since we're just sitting or walking quietly, not interacting with anyone. Formal meditation is the time for training the mind, for strengthening mindfulness. But ordinary life is the testing-ground. Daily life is filled with situations that might provoke us into unwholesome speech and behavior. This is when we get to see if the mind reacts differently than it used to. Are we less up and down? Do we let go of things more quickly? When unpleasant events happen, is there less suffering? Do we know ourselves better? Do we keep our attention in the present moment more, and get lost in memories less? In daily life we should especially try to be aware whenever the mind is disturbed by a strong emotion, including attachment or aversion, labeling the impulse with a mental note. "Aversion" includes jealousy, fear, and anger, which are all forms of wanting to get rid of something. By seeing the impulse soon enough we can stop it from getting stronger and further upsetting the mind.
There is another aspect to mindfulness in daily life, which is called "clear comprehension," a type of skillful understanding. Applied to daily life it means being aware of the motivations for, and the purpose and results of, our speech and actions. The Buddha taught that before speaking we should ask ourselves whether the words are true or false, harmful or helpful. Before criticizing a co-worker, for example, we should decide whether the remark would truly be useful or would just hurt the person. If not helpful we should refrain from saying it, even if it's true. This mental examination doesn't have to take long. It can be done in just a second or two before speaking.
It is even more important to consider our actions before performing them, to avoid doing anything harmful and breaking the moral precepts. Throughout the day we should try to cultivate only wholesome speech and actions. The more we practice mindfulness, the more clearly we will see the hidden motives—selfish or otherwise—behind our speech and actions. Often we'll immediately know whether our motives are wholesome or unwholesome.
As we gain more experience we can apply clear comprehension to thoughts as well, trying to deliberately cultivate wholesome thoughts based on wisdom, loving-kindness and compassion, and gently letting go of unwholesome thoughts by not dwelling on or repeating them. At the same time, we should remember never to judge ourselves for having unwholesome thoughts. Everyone who is not yet fully enlightened has bad thoughts at times. We cannot control them. But that doesn't mean we should act on them. When an unwholesome thought arises we can just be aware it has appeared and then gently let it go. By "catching" these thoughts as soon as they arise, they'll have less chance of getting stronger and influencing our speech and behavior.
Whenever strong negative emotions such as anger or fear arise in daily life a meditator can always use the very effective technique of mental noting. As soon as you're aware of the anger, simply note "anger, anger," a few times, and then try to let the emotion go. If the anger is still there, continue to observe the feeling without getting involved or caught up in it. Try to separate your awareness from the anger. Merely watch the emotion as if you were standing outside of it. If you continue watching it impartially, without getting caught up or acting on it through wrong speech, it will change and, sooner or later, disappear. You will see this for yourself. All emotions and mental states are impermanent. A few minutes from now you'll probably be thinking of something else and the emotion may have vanished completely. Reminding yourself of this when a strong emotion overtakes you can be a great help.
There are other methods for skillfully dealing with negative emotions in daily life. If we believe, for example, that someone is unfairly angry with us, instead of retaliating we can try to reflect along these lines: "a person who is angry harms his own mind. Anger feels very uncomfortable. It burns. An angry person is totally agitated and never at peace. Whether or not it hurts anyone else, anger always hurts the one who's angry. Why should I hurt myself by getting angry in return?" By habitually reflecting like this, our anger will diminish more quickly.
Reflecting wisely on the Buddha's teaching of kamma (karma) can also help diminish anger, jealousy, and other negative emotions. The Buddhist suttas describe many ways for dealing with unwholesome emotions in daily life, which are too numerous to explain here. In his booklet The Elimination of Anger, Ven. K. Piyatissa Thera describes eight ways to counteract anger, all taken from the Buddhist suttas. These are skillful techniques we can use immediately, at any time. In the long-term, however, the only permanent method for overcoming anger, anxiety, depression, fear and other negative emotions is to practice vipassana meditation.
Copyright © 2006 - 2012 Cynthia Thatcher
Illustrations in the section "Mindfulness When Changing Posture" Copyright © 1990 Helen Jandamit
 Printable Version